Sunday, February 27, 2011

Toggling between textarea and CKEditor...

CKEditor has a jQuery adapter that makes it easy to plug-in. See the install docs at: http://ckeditor.com/blog/CKEditor_for_jQuery.

There is a getEditor() function that can be used to invoke against a jQuery object, but if a CKEditor object related to the textarea doesn't exist, it throws an exception. To get around this issue, we can implement our own version:
function disableCKEditor(textarea) {
    // We cannot use getEditor() since it will throw an exception.
    // http://ckeditor.com/blog/CKEditor_for_jQuery
    var ck = textarea.eq(0).data('ckeditorInstance');
    if (ck) {
        ck.destroy();
        ck = false;
    }
}

To create a ckeditor object, we can invoke ckeditor() against the text area jQuery object.
       // NOTE: If the django-filebrowser app is not used, then remove the filebrowserBrowseUrl.
        // Using ckeditor() to replace a textarea does not call ckeditor/config.js, so we must
        // specify the config explicitly.
        content_field.ckeditor(function() { }, {width: '100%', 
                                                filebrowserBrowseUrl: '/admin/filebrowser/browse?pop=3'
                                               });

Integrating CKEditor and filebrowser into Django pagelets...

The Caktus Consulting Group has released a few useful Django apps that allow you to implement your own CMS on top of Django, which includes django-pagelets and django-treenav. This allows users with authorized access to modify content directly on your page. No more updated HTML files when you can update unstructured content directly on the site!

One of the issues is that it comes out of the box with a WymEditor support. What if we wanted to use the Django filebrowser and CKEditor?

First, a set of check-ins that has been sent to enable this support within django-pagelets. Check out https://github.com/rogerhu/django-pagelets for more information. Hopefully the authors will include these set of changes so that the following changes can be done. For now, you'll need to pull from my fork until then.

1) If you wish to use CKEditor with this plug-in, you can define a PAGELET_CONTENT_TYPES within your settings.py file:
PAGELET_CONTENT_TYPES = (
    ('html', 'HTML'),
    ('wymeditor', 'WYMeditor'),
    ('ckeditor', 'CKEditor'),
    ('textile', 'Textile')
    )
2) You'll need to install CKEditor into your MEDIA_URL dir inside the 'ckeditor/' directory. The CKEditor package should include the ckeditor/ckeditor.js and ckeditor/adapters/jquery.js.

3) If you're also using the Django grappelli/filebrowser app, then you also need to setup and install django-grappelli and django-filebrowser too. For using grappelli/filebrowser, there are a few additional configuration tweaks that must be done, including setting your ADMIN_MEDIA_PREFIX and installing any other dependencies. You may wish to checkout this blog posting for more info: http://hustoknow.blogspot.com/2011/02/installing-grappelli.html

4) The wymeditor/js/pagelets.js has the following instantiation:
    if (value.toLowerCase() == 'ckeditor') {
        // NOTE: If the django-filebrowser app is not used, then remove the filebrowserBrowseUrl.
        // Using ckeditor() to replace a textarea does not call ckeditor/config.js, so we must

        // specify the config explicitly.
        content_field.ckeditor(function() { }, {width: '100%', 
                                                filebrowserBrowseUrl: '/admin/filebrowser/browse?pop=3'
                                               });
    }

If you're not going to use the Django filebrowser/grappelli plug-ins, remove the filebrowserBrowseUrl definition. See http://docs.cksource.com/CKEditor_3.x/Developers_Guide/File_Browser_(Uploader) for
more information.

5) You'll also need to modify the forms.py to include js_wym_ckeditor too:
        js_wymeditor = ('wymeditor/jquery.wymeditor.js',
              'wymeditor/plugins/embed/jquery.wymeditor.embed.js'  # fixes YouTube embed issues
              'js/pagelets.js') 

        js_wym_ckeditor = (
        # We assume CKEditor and filebrowser Django app are in these locations
                'ckeditor/ckeditor.js',
                'filebrowser/js/FB_CKEditor.js',
                'ckeditor/adapters/jquery.js')

        js = js_wymeditor + js_wym_ckeditor + ('js/pagelets.js',)

Integrating CKEditor with Django filebrowser and admin console..

There are great docs out there already to show how you to integrate CKEditor into the Django admin console, but how does one make it work with the Django filebrowser app?

1. Install CKEeditor and get it working on your Django admin console (see http://johansdevblog.blogspot.com/2009/10/adding-ckeditor-to-django-admin.html)

The rest of the instructions were based off an issue report regarding CKEditor and the Django filebrowserhttp://code.google.com/p/django-filebrowser/issues/detail?id=193
2. The Django filebrowser comes with a JavaScript code that enables CKEditor to be used.
class Media:
            js = ("ckeditor/ckeditor.js",
                 "filebrowser/js/FB_CKEditor.js")
3. Copy the change_form.html (if you're using the grappelli Django app, copy the templates/change_form.html from that app)

{% block extrahead %}
                            <script type="text/javascript">
        
                                if (CKEDITOR) {
                                    // Added by Roger Hu 02/27/2010
                                    CKEDITOR.config.filebrowserBrowseUrl = '/admin/filebrowser/browse?pop=3';
                                }
                            </script>

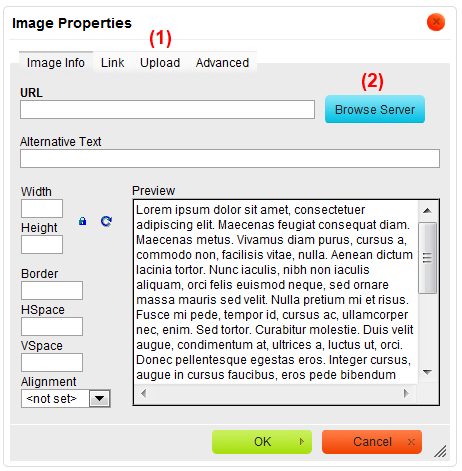
Once this happens, you should be able to use CKEditor with filebrowser:

Installing Grappelli

One very cool app for Django is the filebrowser app, which lets you peruse your MEDIA_URL folder, rename files, and view different thumbnail versions of your image. A screenshot of the console is here:


One thing you also notice is that the filebrowser app uses a different look and feel for Django. In fact, it depends on the grappelli Django app to install, which is a re-skinned version of the Django admin console. It definitely gives it a much more slick view than the one that comes with the normal Django install.
pip install django-grappelli
pip install django-filebrowser

The installation for grappelli is located here:
http://django-grappelli.readthedocs.org/en/latest/quickstart.html#installation

One thing to note is that the install instructions refer to using the collectstatic management command, which relies on the django.contrib.staticfiles library in the Django 1.3 development version. If you're running Django v1.2, you'll find that django.contrib.staticfiles just doesn't exist. The documentation for this module is located at:
http://docs.djangoproject.com/en/dev/ref/contrib/staticfiles/

For now, you can skip installing Django v1.3 and not use the collectstatic management command. If you do, then you

You do need to modify your settings.py file to define the ADMIN_MEDIA_PREFIX...the documentation says to use STATIC_URL but unless you're using Django v1.3 and/or the collectstatic command, then you're probably better off copying the grapelli/template files into a separate dir within your MEDIA_URL dir:
ADMIN_MEDIA_PREFIX = MEDIA_URL + "grappelli/"

You'll want to verify that you can render/view correctly the grappelli template files you copied. If you're running a debug server, you may get "Permission Denied" messages when trying to access the grappelli dir. The solution appears to be set ADMIN_MEDIA_PREFIX to a fully qualified hostname:

http://stackoverflow.com/questions/1081596/django-serving-admin-media-files

Another way is to use the --adminmedia flag, which seems to be a point of contention on the Django forums:

http://code.djangoproject.com/ticket/8336
./manage.py runserver --adminmedia=`pwd`/media/grappelli
http://code.google.com/p/django-grappelli/issues/detail?id=149

Keep in mind that if you've modified any of the admin/templates from the original Django source, the admin/templates that grappelli are nothing like the vanilla install, which means you'll have to re-copy those files and re-implement any custom code you have.

Friday, February 25, 2011

LinkedIn and &038 posting issues

LinkedIn has a strange error when using its Share API
Couldn't parse share document: error: Unexpected character encountered (lex state 3): 'h' 

I was able to replicate the issue by doing a wget on this file:
http://developer.linkedin.com/docs/DOC-1212

...and then noticing that the document got retrieved with this URL encoding for Clara's Facebook Era image:

This link breaks:
http://thecommunicationsstrategist.files.wordpress.com/2010/10/the-facebook-era-cover-2nd-edition.jpg?w=199&h=300

This link works::
http://thecommunicationsstrategist.files.wordpress.com/2010/10/the-facebook-era-cover-2nd-edition.jpg?w=199&#038;h=300

It looks to me Wordpress is inserting back 038 characters and LinkedIn is barfing because of it:

http://www.simplestepsit.com/your-html-ampersand-doesnt-work-in-wordpress-now-what.html
http://codex.wordpress.org/How_WordPress_Processes_Post_Content

&
The post processing can take your “&” character and covert it to & which can be a problem if the page is used for video embedding codes and URL’s.
The page I was working on used these special parameters to set the column width and sent the information back to the video service, which then inserted the HTML back into my page. Since WordPress would change the code ‘on the fly’ (not inside my database), I didn’t see this issue at first.
Fortunately for me, while debugging another issue, the support person for the video service did notice and brought it to my attention and I tracked down the issue and the fix.

I guess Wordpress bloggers should know about this issue:

http://www.simplestepsit.com/your-html-ampersand-doesnt-work-in-wordpress-now-what.html

Wednesday, February 23, 2011

Twitter's id_str..

http://groups.google.com/group/twitter-api-announce/browse_thread/thread/6a16efa375532182

What should you do - RIGHT NOW 
---------------------------------------------- 
The first thing you should do is attempt to decode the JSON snippet above 
using your production code parser. Observe the output to confirm the ID has 
not lost accuracy. 
What you do next depends on what happens: 
* If your code converts the ID successfully without losing accuracy you are 
OK but should consider converting to the _str versions of IDs as soon as 
possible. 
* If your code has lost accuracy, convert your code to using the _str 
version immediately. If you do not do this your code will be unable to 
interact with the Twitter API reliably. 
* In some language parsers, the JSON may throw an exception when reading the 
ID value. If this happens in your parser you will need to ‘pre-parse’ the 
data, removing or replacing ID parameters with their _str versions. 

How Celery implements eta/countdown...

Internals of the Celery worker:
http://ask.github.com/celery/internals/worker.html

http://groups.google.com/group/celery-users/browse_thread/thread/b85c0f8386ffd4ce

I'll try to describe it in brief... The worker.scheduler module is actually long gone now, 
most of the functionality there is replaced by timer2: https://github.com/ask/timer2 
But timer2 is just the internal mechanism that applies a timed function, I'm assuming what 
you're really interested in is how the messaging part works. 
From the comments in celery.worker.consumer: http://ask.github.com/celery/internals/reference/celery.worker.consum... 
" 
* If the task has an ETA/countdown, the task is moved to the `eta_schedule` 
  so the :class:`timer2.Timer` can schedule it at its 
  deadline. Tasks without an eta are moved immediately to the `ready_queue`, 
  so they can be picked up by the :class:`~celery.worker.controllers.Mediator` 
  to be sent to the pool. 
* When a task with an ETA is received the QoS prefetch count is also 
  incremented, so another message can be reserved. When the ETA is met 
  the prefetch count is decremented again, though this cannot happen 
  immediately because amqplib doesn't support doing broker requests 
  across threads. Instead the current prefetch count is kept as a 
  shared counter, so as soon as  :meth:`~Consumer.consume_messages` 
  detects that the value has changed it will send out the actual 
  QoS event to the broker. 
" 
So pretty simple, whenever a task with an eta is received we increment the 
prefetch_count, when the task is processed we decrement it again.  We 
can keep the eta tasks in memory for as long as we like since the message 
will just be redelivered if the connection is lost and the message is not acked. 
Hope this helps, 
-- 

Setting up Nose for Django and Hudson

1.
pip install coverage
pip install nose
pip install django_nose
pip install nose-exclude
pip install git+git://github.com/cmheisel/nose-xcover.git#egg=nosexcover

2. The Django nose app works by injecting extra options before the 'test' management command is called. This way, you can invoke 'manage.py test' and still have all the options that are available to you if you were to invoke Nose with a normal Python app:

django_nose/management/commands/test.py
TestRunner = get_runner(settings)

if hasattr(TestRunner, 'options'):
    extra_options = TestRunner.options
else:
    extra_options = []

class Command(Command):
    option_list = Command.option_list + tuple(extra_options)

3. One issue encountered is that if you have a 'setup' as a Django app, nose will report issues since it attempts to search through your main directory looking for your own test suite runner that imports from django_nose:
from django_nose import NoseTestSuiteRunner
from nose.suite import ContextSuite
ContextSuite.moduleSetup = ('setup_module', 'setupModule', 'setUpModule', 'setupHolder',     'setUp')
  
MyTestSuiteRunner = NoseTestSuiteRunner

Inside the settings.py file, you would then set your test runner to:
TEST_RUNNER = 'myapp.test.nose_utils.MyTestSuiteRunner'
# The --with-coverage allows coverage reports to be generated, but we need to
# specify that HTML outputs should be generated and use the Hudson HTML
# Publisher to post them within the jobs.  
# Without the --exe, Nose will  ignore executable tests.py files.
# We need the --cover-package to force it to look only in the current directory.
# The --nocapture allows us to see what's going on at stdout and use pdb for breaking checking.# Set --testmatch to look for files that start only with tests.
NOSE_ARGS = ( '--with-coverage', '--cover-html', '--cover-html-dir=xmlrunner/html', '--cover-package=myapp', '--nocapture', '--testmatch=^test')
HUDSON_NOSE_ARGS = ('--with-xunit', '--xunit-file=xmlrunner/nosetests.xml', '--with-xcoverage', '--xcoverage-file=coverage.xml')
NOSE_ARGS = NOSE_ARGS + HUDSON_NOSE_ARGS

You should change --cover-package accordingly.

4. Your Hudson test command would be something similar to the following
./manage.py test --settings=settings.hudson --testmatch="^test" --with-xunit --xunit-file=xmlrunner/nosetests.xml --with-xcoverage --xcoverage-file=coverage.xml --noinput

5. Don't forget to configure Hudson to look for the coverage.xml file and xmlrunner/**.xml! The directory that outputs nose tests should be in a separate dir from the code coverage, since adding extra XML tests such as JSLint will allow you to use a wildcard on an entire directory to look for JUnit-based reports.

6. If you're using the Hudson extended email-notification, you also need may need to tweak things to deal with the fact that Gmail and other webmail clients may ignore CSS <style> tags:

http://hustoknow.blogspot.com/2011/02/using-hudsons-email-ext.html

7. If you want to restrict Nose to look for only your Django-based tests (instead of unittest.TestCase), you can add a Selector:

http://packages.python.org/nose/doc_tests/test_selector_plugin/selector_plugin.html.
from django.test import TestCase as DjangoTestCase

class MySelector(Selector):
    def wantClass(self, cls):
        """ Make sure we're searching for a Django TestCase class, not a Python unittest class.
        This overrides the Nose default behavior."""
        return issubclass(cls, DjangoTestCase)

You would then add this line to your settings.py file:
NOSE_PLUGINS = ['myapp.test.nose_utils.MySelector',]

8. If you are noticing that the package name outputs are out of order or your conditional branches are not being reported, check out this link:

http://hustoknow.blogspot.com/2011/03/coveragepy-xml-outputs-in-random-order.html

9. Install the HTML Publisher Hudson plug-in and specify the output location of the HTML dir (specified by the --html-dir-output= dir) inside NOSE_ARGS. Once the HTML Publisher plug-in installed, click on Publish HTML Reports and specify the directory location (you'll need to create the directory too relative to the jobs/ directory path). In this example, I created an xmlrunner/html dir so that the HTML files will all output there.
Tuesday, February 22, 2011

Django-nose and Python nose

The most complete documentation about Python nose appears to be located here:
http://somethingaboutorange.com/mrl/projects/nose/1.0.0/writing_tests.html

Python nose uses auto-discovery by doing a regular expression using the testMatch pattern:

As with py.test, nose tests need not be subclasses of unittest.TestCase. Any function or class that matches the configured testMatch regular expression ((?:^|[\\b_\\.-])[Tt]est) by default – that is, has test or Test at a word boundary or following a - or _) and lives in a module that also matches that expression will be run as a test. For the sake of compatibility with legacy unittest test cases, nose will also load tests from unittest.TestCase subclasses just like unittest does. Like py.test, nose runs functional tests in the order in which they appear in the module file. TestCase-derived tests and other test classes are run in alphabetical order.
Within nose/config.py, this testMatch is defined here:
self.testMatch = re.compile(r'(?:^|[\\b_\\.%s-])[Tt]est' % os.sep) 

We can either override by invoking nose with the --testmatch parameter:
)
        parser.add_option(
            "-m", "--match", "--testmatch", action="store",
            dest="testMatch", metavar="REGEX",
            help="Files, directories, function names, and class names "
            "that match this regular expression are considered tests.  "
            "Default: %s [NOSE_TESTMATCH]" % self.testMatchPat,
            default=self.testMatchPat)

The Django nose runner also allows us to set the configuration by setting things as the environment variable too (NOSE_TESTMATCH):

config = nose.core.Config(env=os.environ, files=cfg_files, plugins=manager)

Wednesday, February 16, 2011

Facebook's Cross-Domain (XD) receiver, IE7, jQuery woes

Facebook's JavaScript SDK contains several ways of setting up a cross-domain (XD) receiver. The motivation behind using XD receiver is obviously to get around the browser security so that Facebook can invoke JavaScript-based commands on the client browser. If you de-minify the Facebook connect code or inspect the hidden div, you'll see that the initialization tries to use Adobe Flash SWF objects first.

If you use the following snippet code with jQuery on IE7 with the Facebook Connect JavaScript, you'll notice that the alert() statement will appear twice during a page reload. If you inspect your DOM tree (look for a div ID of fb-root or class fb_reset), you'll notice that the Facebook JS SDK actually injected the same code within another hidden IFRAME element!


$(document).ready(function () {
  alert('here');
});

I first noticed that the problem didn't happen for Chrome and Internet Explorer 8 but did occur for IE7. Apparently a consequence of the cross-domain receiver on IE7 (and other browsers that don't have a minimum of Adobe Flash 10) is that page loads occur twice. This page load can cause all sorts of issues, such as conflicting ID tags or other strange issues (i.e. onload events don't trigger for IFrame elements).

IE7 by default runs Flash 9.0, and Adobe Flash 10.0 seems to be the minimum for the SWF-based approach to work. Apparently Facebook seems to have found that the SWF-approach is perhaps more browser compatible (or doesn't cause multiple page loads) and therefore tries to use it before falling back to the IFRAME-based approach.

The code that handles this logic is stored inside the all.js for the Facebook Connect:

FB.provide('XD', {
  _origin: null,
  _transport: null,
  _callbacks: {},
  _forever: {},
  init: function(a) {
    if (FB.XD._origin) return;
    if (window.addEventListener && !window.attachEvent && window.postMessage) {
      FB.XD._origin = (window.location.protocol + '//' + window.location.host + '/' + FB.guid());
      FB.XD.PostMessage.init();
      FB.XD._transport = 'postmessage';
    } else if (!a && FB.Flash.hasMinVersion()) {
      FB.XD._origin = (window.location.protocol + '//' + document.domain + '/' + FB.guid());
      FB.XD.Flash.init();
      FB.XD._transport = 'flash';
    } else {
      FB.XD._transport = 'fragment';
      FB.XD.Fragment._channelUrl = a || window.location.toString();
    }
  },

Facebook seems to know about this issue and has provided the custom channel URL parameter when invoking FB.init. The document is located here:

http://developers.facebook.com/docs/reference/javascript/fb.init/
Custom Channel URL

This is an option that can help address three specific known issues. First, when auto playing audio/video is involved, the user may hear two streams of audio because the page has been loaded a second time in the background for cross domain communication. Second, if you have frame busting code, then you would see a blank page. Third, this will prevent inclusion of extra hits in your server-side logs. In these scenarios, you may provide the optional channelUrl parameter:

 <script src="http://connect.facebook.net/en_US/all.js"></script>
 <script>
   FB.init({
     appId  : 'YOUR APP ID',
     channelUrl  : 'http://example.com/channel.html'  // custom channel
   });
 </script>
The contents of the channel.html file should be this single line:

 <script src="http://connect.facebook.net/en_US/all.js"></script>

The channelUrl MUST be a fully qualified absolute URL. If you modify the document.domain, it is your responsibility to make the same document.domain change in the channel.html file as well. Remember the protocols must also match. If your application is https, your channelUrl must also be https. Remember to use the matching protocol for the script src as well. You MUST send valid Expires headers and ensure the channel file is cached by the browser. We recommend caching indefinitely. This is very important for a smooth user experience, as without it cross domain communication becomes very slow.

The bug report is being tracked here:

http://bugs.developers.facebook.net/show_bug.cgi?id=9777

HAProxy only sets the X-Forwarded-For header for the first request..

http://haproxy.1wt.eu/download/1.2/doc/architecture.txt

   if the application needs to log the original client's IP, use the
   "forwardfor" option which will add an "X-Forwarded-For" header with the
   original client's IP address. You must also use "httpclose" to ensure
   that you will rewrite every requests and not only the first one of each
   session :

        option httpclose
        option forwardfor

   The web server will have to be configured to use this header instead.
   For example, on apache, you can use LogFormat for this :

        LogFormat "%{X-Forwarded-For}i %l %u %t \"%r\" %>s %b " combined
        CustomLog /var/log/httpd/access_log combined

Friday, February 11, 2011

Installing dj-celery and modifying Django settings...

One of the recent changes with using django-celery (in v2.0.0+) is that you must now specify your Celery configuration with your Django settings file. The instructions are to import djcelery and then invoke djcelery.setup_loader(), which will inform Celery to use the djcelery.loaders.DjangoLoader class instead of the default Celery base loader.

Besides the fact that djcelery often grabs CELERY_RESULT_BACKEND variable from your Django settings file, the read_configuration() within this loader is what retrieves the rest of the config information back to Celery. Therefore, if you intend to use djcelery for Django management commands, you should know about how this works.

class DjangoLoader(BaseLoader):
    """The Django loader."""

    def read_configuration(self):
        """Load configuration from Django settings."""
        from django.conf import settings
        self.configured = True
        return settings

Normally Celery's default BaseLoader class invokes Celery as follows, which is to import the Celery configs from either the environment variable CELERY_CONFIG_MODULE or through its default celeryconfig.py file. The DjangoLoader overrides this part to retrieve the Celery configuration from the settings.py file.

def read_configuration(self):
        """Read configuration from ``celeryconfig.py`` and configure
        celery and Django so it can be used by regular Python."""
        configname = os.environ.get("CELERY_CONFIG_MODULE",
                                    DEFAULT_CONFIG_MODULE)
        try:
            celeryconfig = self.import_from_cwd(configname)
        except ImportError:
            warnings.warn("No celeryconfig.py module found! Please make "
                          "sure it exists and is available to Python.",

Thursday, February 10, 2011

X-Forwarded-For vs. HTTP_X_FORWARDED_HOST vs. HTTP_HOST

X-Forwarded-For

http://en.wikipedia.org/wiki/X-Forwarded-For
The X-Forwarded-For (XFF) HTTP header field is a de facto standard for identifying the originating IP address of a client connecting to a web server through an HTTP proxy or load balancer. This is a non-RFC-standard request field which was introduced by the Squid caching proxy server's developers.

HTTP_X_FORWARDED_HOST

Apache's mod_proxy code inserts the HTTP_X_FORWARDED_HOST header for the originating host. Apache

modules/proxy/mod_proxy_http.c
/* Add X-Forwarded-Host: so that upstream knows what the
         * original request hostname was.
         */
        if ((buf = apr_table_get(r->headers_in, "Host"))) {
            apr_table_mergen(r->headers_in, "X-Forwarded-Host", buf);
        }

HTTP_HOST

http://stackoverflow.com/questions/4096151/how-reliable-is-http-host
HTTP_HOST is for the Host: header sent by HTTP 1.1 user-agents during the request. This is not used by HTTP 1.0 clients, so it won't appear then. However, nowadays, I don't think there are still many HTTP 1.0 clients.
Contents of the Host: header from the current request, if there is one.

http://www.w3.org/Protocols/rfc2616/rfc2616-sec14.html
The Host request-header field specifies the Internet host and port number of the resource being requested, as obtained from the original URI given by the user or referring resource (generally an HTTP URL, as described in section 3.2.2). The Host field value MUST represent the naming authority of the origin server or gateway given by the original URL. This allows the origin server or gateway to differentiate between internally-ambiguous URLs, such as the root "/" URL of a server for multiple host names on a single IP address.

Host = "Host" ":" host [ ":" port ] ; Section 3.2.2
A "host" without any trailing port information implies the default port for the service requested (e.g., "80" for an HTTP URL). For example, a request on the origin server for  would properly include:

GET /pub/WWW/ HTTP/1.1
Host: www.w3.org

A client MUST include a Host header field in all HTTP/1.1 request messages . If the requested URI does not include an Internet host name for the service being requested, then the Host header field MUST be given with an empty value. An HTTP/1.1 proxy MUST ensure that any request message it forwards does contain an appropriate Host header field that identifies the service being requested by the proxy. All Internet-based HTTP/1.1 servers MUST respond with a 400 (Bad Request) status code to any HTTP/1.1 request message which lacks a Host header field.

See sections 5.2 and 19.6.1.1 for other requirements relating to Host.

mod_wsgi will then set HTTP_HOST from the Host: header

mod_wsgi.c:
 if (apr_table_get(r->subprocess_env, "HTTP_HOST")) {
        apr_table_setn(r->headers_in, "Host",
                       apr_table_get(r->subprocess_env, "HTTP_HOST"));
    }

Wednesday, February 9, 2011

How Django's test client replaces the current database with a test one..

Django stores this information inside the self.connection.settings_dict, which gets replaced with test_database_name when a test database is created. This create_test_db() gets invoked by its various Django management commands to setup a test database.

django/db/backends/creation.py
def create_test_db(self, verbosity=1, autoclobber=False):
        """                                                                                                                                                                       
        Creates a test database, prompting the user for confirmation if the                                                                                                       
        database already exists. Returns the name of the test database created.                                                                                                   
        """
        if verbosity >= 1:
            print "Creating test database '%s'..." % self.connection.alias

        test_database_name = self._create_test_db(verbosity, autoclobber)

        self.connection.close()
        self.connection.settings_dict["NAME"] = test_database_name
        can_rollback = self._rollback_works()
        self.connection.settings_dict["SUPPORTS_TRANSACTIONS"] = can_rollback

        call_command('syncdb', verbosity=verbosity, interactive=False, database=self.connection.alias)

        if settings.CACHE_BACKEND.startswith('db://'):
            from django.core.cache import parse_backend_uri, cache
            from django.db import router
            if router.allow_syncdb(self.connection.alias, cache.cache_model_class):
                _, cache_name, _ = parse_backend_uri(settings.CACHE_BACKEND)
                call_command('createcachetable', cache_name, database=self.connection.alias)

        # Get a cursor (even though we don't need one yet). This has                                                                                                              
        # the side effect of initializing the test database.                                                                                                                      
        cursor = self.connection.cursor()

        return test_database_name

Also, within the code, the TEST_NAME determines the database name. If it doesn't exist, the TEST_DATABASE_PREFIX is used:
     if self.connection.settings_dict['TEST_NAME']:
            test_database_name = self.connection.settings_dict['TEST_NAME']
        else:
            test_database_name = TEST_DATABASE_PREFIX + self.connection.settings_dict['NAME']

Setting up PyLint on Hudson

Setting up PyLint with Hudson was pretty straightforward, though there are various sources of documentation that have to be searched to get things configured right. Here is the basic steps that I took:

1. pip install pylint

2. pip --generate-rcfile > ~/build-scripts/pylintrc
3. ln -s ~/build-scripts/pylintrc ~/.pylintrc

4. vi ~/.pylintrc (These error messages were taken from  http://stackoverflow.com/questions/35470/are-there-any-static-analysis-tools-for-python)

# Brain-dead errors regarding standard language features
#   W0142 = *args and **kwargs support
#   W0403 = Relative imports

# Pointless whinging
#   R0201 = Method could be a function
#   W0212 = Accessing protected attribute of client class
#   W0613 = Unused argument
#   W0232 = Class has no __init__ method
#   R0903 = Too few public methods
#   C0301 = Line too long
#   R0913 = Too many arguments
#   C0103 = Invalid name
#   R0914 = Too many local variables

# PyLint's module importation is unreliable
#   F0401 = Unable to import module
#   W0402 = Uses of a deprecated module

# Already an error when wildcard imports are used
#   W0614 = Unused import from wildcard

# Sometimes disabled depending on how bad a module is
#   C0111 = Missing docstring

# Disable the message(s) with the given id(s).
# NOTE: the Stack Overflow thread uses disable-msg, but as of pylint 0.23.0, disable= seems to work.
disable=W0142,W0403,R0201,W0212,W0613,W0232,R0903,W0614,C0111,C0301,R0913,C0103,F0401,W0402,R09
5. Inside the pylintrc file, you'll also want to set the output-format to be parseable, which is what the Hudson plug-in format expects to use. You can also turn off reports=no to ensure that Hudson does not complain about the report at the end.
# Set the output format. Available formats are text, parseable, colorized, msvs
# (visual studio) and html
output-format=parseable

# Include message's id in output
include-ids=no

# Put messages in a separate file for each module / package specified on the
# command line instead of printing them on stdout. Reports (if any) will be
# written in a file name "pylint_global.[txt|html]".
files-output=no

# Tells whether to display a full report or only the messages
reports=no
6. You may also see warnings about a Django object does not contain the 'objects' member. To turn it off, you can use (see http://stackoverflow.com/questions/115977/using-pylint-with-django):
# List of members which are set dynamically and missed by pylint inference
# system, and so shouldn't trigger E0201 when accessed.
generated-members=REQUEST,acl_users,aq_parent,objects
6. You can then create a script that can be executed as a Build Step inside Hudson:
#!/bin/bash -x
PYLINTRC=`readlink -f ~/build-scripts/pylintrc`
cd "${WORKSPACE}
pylint --rcfile=${PYLINTRC} `find . -name "*.py"` 2>&1 > xmlrunner/pylint.txt
7. You can then setup the Hudson Violations plug-in to search for xmlrunner/py**.txt so that it can find both Pylint, PyFlakes, and PyChecker outputs.

Tuesday, February 8, 2011

Function return types are inconsistent messages in PyChecker

PyChecker returns a whole slew of warning/error messages, including "Function return types are inconsistent". What does this message mean? Well essentially behind the scenes what PyChecker attempts to do is create an array list of all the return values/types in your function inside the code.returnValues variable. If there are at least 2 sets of return values, then PyChecker can iterate through by picking the first return value pair and comparing it against the rest. If there is a mismatch, the INCONSISTENT_RETURN_TYPE flag is raised.

The following code in pychecker/warn.py does the checking:

def _checkReturnWarnings(code) :
    is_getattr = code.func_code.co_name in ('__getattr__', '__getattribute__')
    if is_getattr :
        for line, retval, dummy in code.returnValues :
            if retval.isNone() :
                err = msgs.DONT_RETURN_NONE % code.func_code.co_name
                code.addWarning(err, line+1)

    # there must be at least 2 real return values to check for consistency                                                                        
    returnValuesLen = len(code.returnValues)
.
.
.

    for line, value, dummy in code.returnValues :
        if not value.isNone() :
            valueType = value.getType(code.typeMap)
            if returnType is None and valueType not in _IGNORE_RETURN_TYPES :
                returnData = value
                returnType = valueType
                continue

            # always ignore None, None can be returned w/any other type                                                                           
            # FIXME: if we stored func return values, we could do better                                                                          
            if returnType is not None and not value.isNone() and \
               valueType not in _IGNORE_RETURN_TYPES and \
               returnData.type not in _IGNORE_RETURN_TYPES :
                ok = returnType in (type(value.data), valueType)
                if ok :
                    if returnType == types.TupleType :
                        # FIXME: this isn't perfect, if len == 0                                                                                  
                        # the length can really be 0 OR unknown                                                                                   
                        # we shouldn't check the lengths for equality                                                                             
                        # ONLY IF one of the lengths is truly unknown                                                                             
                        if returnData.length > 0 and value.length > 0:
                            ok = returnData.length == value.length
                else :
                    ok = _checkSubclass(returnType, valueType) or \
                         _checkSubclass(valueType, returnType)
                if not ok :
                    code.addWarning(msgs.INCONSISTENT_RETURN_TYPE, line)

Can't seem to POST picture= links using the Facebook API?

Some links are already URL-encoded, so you have to watch-out when posting to the Facebook Graph API, especially when trying to post on someone's wall not to accidentally try to invoke urllib.urlencode().

One way is to use the unquote() function in the urllib() to first decode it:
if picture:
        picture = urllib.unquote(picture)

Then when you use urlencode data again, you can have some piece of mind that the code will be posted correctly. One way is to grab the ID returned by the POST call, and then JSON-decoding the response to verify that the dictionary has the 'picture' keyword:

response = urllib.urlopen("http://graph.facebook.com/%s" % id).read()
json_data = json.loads(response)

self.assertTrue(json_data.has_key('picture'))

The issue is similar (not sure if it's related) to the bug reported at: http://bugs.developers.facebook.net/show_bug.cgi?id=11970

Monday, February 7, 2011

Django's test runner sets settings.DEBUG to False...

 def setup_test_environment(self, **kwargs):
        setup_test_environment()
        settings.DEBUG = False

Wednesday, February 2, 2011

passfail work on JSLint?

I checked out the latest version of JSLint and found that regardless of setting the passfail to be true/false, JSLint would always abort after the 1st line. This naturally caused issues if one wanted to use JSLint with Hudson and be able to dump out all the results from JSLint so that they could be corrected all at once.

I dug through the code and noticed that this line seemed to be causing the issue:

https://github.com/rogerhu/JSLint/commit/ac9e88a1aadcc26eb7f5d8b76abdb0fe2854c71b

The problem appears to have persisted at least since the 03/06/10 version of fulljslint.js.

JSLint and Rhino support...

Official support for JSLint and Rhino has been dropped according to this post by Douglas Crockford:
http://tech.groups.yahoo.com/group/jslint_com/message/1636
I am dropping support for rhino.js and wsh.js because others have improved on
them. If you have such an improvement, please add a record describing it.
Thank you.
Here is what the original rhino.js file looks like:
https://github.com/douglascrockford/JSLint/commit/ca120a731db548c0014320fa0c196edc613536ae#diff-3

The actual GitHub that removed this file is located here:
https://github.com/douglascrockford/JSLint/commit/523956b6a2a6771ecfdd138934ed0611fb25bc6c

The Rhino'd version on the jslint-utils is basically concatenating the fulljslint.js with a small wrapper program for the Rhino:
cat ./fulljslint.js ./rhino.js > ../rhinoed_jslint.js
The version posted at
https://github.com/mikewest/jslint-utils/commit/6e854f564b517c696a35b72f93a69635bfc66ab3 has the following diff:

Adjust rhino.js

-   accept a 'realfilename' argument for the CSS munging that I'll put
    in later on.

-   change the defaults to what I consider a good baseline (documented
    inline)
var e, i, input, fileToParse, fileToDisplay, defaults;
15c15
<         print("Usage: jslint.js file.js");
---
>         print("Usage: jslint.js file.js [realfilename.js]");

In addition, it changes the JSLint output to be the following:

print('Lint at line ' + e.line + ' character ' +
  47 
+                print('[' + fileToDisplay + '] Lint at line ' + e.line + ' character ' +

If you intend to use Flymake with Emacs, you have to check your flymake-jslint.el to change the regexp accordingly.

(setq flymake-err-line-patterns
;     (cons '("^Lint at line \\([[:digit:]]+\\) character \\([[:digit:]]+\\): \\(.+\\)$"                                                                                                                            
;            nil 1 2 3)                                                                                                                                                                                             
      (cons '("\\[\\(.*\\)\\] Lint at line \\([[:digit:]]+\\) character \\([[:digit:]]+\\): \\(.+\\)$"
              1 2 3 4)
            flymake-err-line-patterns))

(provide 'flymake-jslint)


Page 362 of Learning GNU Emacs from the O'Reilly series and Stack Overflow article explains the reason for the double backslashes. Apparently Emacs needs one backslash when decoding/parsing the Lisp program, and another when creating the regular expression character. Basically the regular expression extracts the file displayed with the \\[ and \\] groupings, and then we extract the filename within it.

JSLint differences and empty block warning messages...

This Rhino JavaScript version appears to avoid issuing "Empty block" warnings. Further examination reveals that the block() checker for JSLint versions out there are all slightly different.

http://www.microidc.com/usr/tools/jslint/rhino/index.html
function block(f) {
        var a, b = inblock, old_indent = indent, s = scope, t;
        inblock = f;
        scope = Object.create(scope);
        nonadjacent(token, nexttoken);
        t = nexttoken;


        funct['(verb)'] = null;
        scope = s;
        inblock = b;
        return a;
     }
The Rhino'd version at https://github.com/mikewest/jslint-utils/blob/master/lib/rhinoed_jslint.js:
function block(f) {
        var a, b = inblock, old_indent = indent, s = scope, t;
        inblock = f;
        scope = Object.create(scope);
        nonadjacent(token, nexttoken);
        t = nexttoken;


      funct['(verb)'] = null;
        scope = s;
        inblock = b;
        if (f && (!a || a.length === 0)) {
            warning("Empty block.");
        }
        return a;
    }
Douglas Crockford's official block() checker (http://www.jslint.com/webjslint.js) or at https://github.com/douglascrockford/JSLint:

function block(ordinary) {
        var a, b = inblock,
            m = strict_mode,
            s = scope,
            t;
        inblock = ordinary;
        scope = Object.create(scope);
        spaces();
        t = nexttoken;
        if (nexttoken.id === '{') {
            advance('{');
            step_in();
            if (!ordinary && !use_strict() && !m && option.strict && funct['(context)']['(global)']) {
                warning(bundle.missing_use_strict);
            }

            a = statements();
        funct['(verb)'] = null;
        scope = s;
        inblock = b;
        if (ordinary && a.length === 0) {
            warning(bundle.empty_block);
        }
        return a;

Tuesday, February 1, 2011

Queries over related objects

The Django documentation mentions that you can use an object itself or a primary key:

http://docs.djangoproject.com/en/dev/ref/models/querysets/

Queries over related objects
Queries involving related objects follow the same rules as queries involving normal value fields. When specifying the value for a query to match, you may use either an object instance itself, or the primary key value for the object.

For example, if you have a Blog object b with id=5, the following three queries would be identical:

Entry.objects.filter(blog=b) # Query using object instance
Entry.objects.filter(blog=b.id) # Query using id from instance
Entry.objects.filter(blog=5) # Query using id directly

How does it work? Within the query.py file, we appear to get the field by name or by primary key:

arg, value = filter_expr
parts = arg.split(LOOKUP_SEP)

if name == 'pk':
  name = opts.pk.name
try:
  field, model, direct, m2m = opts.get_field_by_name(name)


Dozer and memory profiling Django apps

Installing Dozer:

1. First, you must do the following;
pip install --upgrade dozer
pip install --upgrade paste
2. Next, Apache v2 must be configured to run in WSGI Daemon mode.

  WSGIDaemonProcess myhost.domain.com threads=25
  WSGIProcessGroup myhost.domain.com


The Apache documentation discusses in more detail about how the various configurations for WSGI daemon mode can be configured, but the basic gist is that you should not have a processes= definition and simply define a WSGIDaemonProcess and a WSGIProcessGroup. By doing this, wsgi.multiprocess will be set to False, which is what Dozer needs to work. Otherwise, you will see " "Dozer middleware is not usable in a multi-process environment".

3. You need to then modify your WSGI handler to wrap the Dozer import:
import os, sys
sys.path.append('/usr/local/django')
os.environ['DJANGO_SETTINGS_MODULE'] = 'mysite.settings'

import django.core.handlers.wsgi
from dozer import Dozer

application = django.core.handlers.wsgi.WSGIHandler()
application = Dozer(application)
4. The URL to access Dozer is http:///_dozer/index. From there, you can drill-in to view the spark lines.

5. Dozer was inspired by Dowser, so you can review the documentation to see what to expect:

http://www.aminus.net/wiki/Dowser

Other links for tracing memory leaks in Python..

http://www.lshift.net/blog/2008/11/14/tracing-python-memory-leaks